# Flowise Chatbot Setup Guide — Linux/Ubuntu
> Build a fully local AI-powered chatbot using Flowise, Ollama, and a Conversational Retrieval QA Chain with RAG (Retrieval-Augmented Generation).
---
## Table of Contents
1. [Prerequisites](#prerequisites)
2. [Install Ollama](#install-ollama)
3. [Pull Required Models](#pull-required-models)
4. [Install Flowise](#install-flowise)
5. [Start Flowise](#start-flowise)
6. [Import an Existing Flow](#import-an-existing-flow)
7. [Build the Chatbot Flow](#build-the-chatbot-flow)
- [Step 1: Recursive Character Text Splitter](#step-1-recursive-character-text-splitter)
- [Step 2: Document Store (RAG)](#step-2-document-store-rag)
- [Step 3: Ollama Embeddings](#step-3-ollama-embeddings)
- [Step 4: Faiss Vector Store](#step-4-faiss-vector-store)
- [Step 5: Ollama Chat Model](#step-5-ollama-chat-model)
- [Step 6: Buffer Memory](#step-6-buffer-memory)
8. [Upsert Documents](#upsert-documents)
10. [Using Firecrawl (Scrape Websites into RAG)](#using-firecrawl-scrape-websites-into-rag)
11. [Using Cloud LLM APIs (Optional)](#using-cloud-llm-apis-optional)
12. [Deploy Chatbot to Users](#deploy-chatbot-to-users)
- [Direct Link](#direct-link)
- [Embed in Website](#embed-in-website)
- [Session Management](#session-management)
- [Rate Limiting](#rate-limiting)
13. [Troubleshooting](#troubleshooting)
---
## Prerequisites
- Ubuntu 20.04 or later
- At least **8GB RAM** (16GB recommended)
- **Node.js 18+**
- Internet access for first-time model downloads
### Install Node.js 18+
```bash
curl -fsSL https://deb.nodesource.com/setup_18.x | sudo -E bash -
sudo apt-get install -y nodejs
node -v # should print v18.x.x or higher
```
---
## Install Ollama
Ollama runs LLMs locally on your machine.
```bash
curl -fsSL https://ollama.com/install.sh | sh
```
### Make Ollama Accessible on All Interfaces
By default, Ollama only listens on `localhost`. To allow Flowise (and other services) to reach it:
```bash
sudo systemctl edit ollama.service
```
Add the following inside the file:
```ini
[Service]
Environment="OLLAMA_HOST=0.0.0.0"
```
Save and restart:
```bash
sudo systemctl daemon-reload
sudo systemctl restart ollama
```
Verify it's running:
```bash
curl http://localhost:11434/api/tags
```
You should see a JSON response listing available models.
---
## Pull Required Models
### Chat Model (LLM)
```bash
ollama pull qwen2.5:3b # lightweight, good for most use cases
# OR
ollama pull phi3:mini # alternative lightweight model
# OR
ollama pull llama3:8b # better quality, needs more RAM
```
### Embedding Model
```bash
ollama pull nomic-embed-text # required for RAG / vector search
```
### (Optional) Vision Model — for image understanding
```bash
ollama pull llava # allows users to upload screenshots
```
Verify all models are available:
```bash
ollama list
```
---
## Install Flowise
```bash
npm install -g flowise
```
---
## Start Flowise
```bash
npx flowise start
# OR
npx flowise start --PORT=3030 # set port
```
Flowise will start on **http://localhost:3000**
### Run as a Background Service (Recommended for Production)
```bash
# Install PM2 process manager
npm install -g pm2
# Start Flowise with PM2
pm2 start "npx flowise start" --name flowise
# Auto-start on system reboot
pm2 startup
pm2 save
```
### Set Username and Password (Recommended)
```bash
npx flowise start --FLOWISE_USERNAME=admin --FLOWISE_PASSWORD=yourpassword
```
Or with PM2:
```bash
pm2 start "npx flowise start --FLOWISE_USERNAME=admin --FLOWISE_PASSWORD=yourpassword" --name flowise
```
---
## Import an Existing Flow
If you already have a chatflow exported as a `.json` file (e.g. `Product Detection Q&A Chatflow.json`), you can import it directly into Flowise instead of building from scratch.
### Download the Flow File
Get the `.json` file from your repository:
```bash
# Using wget
wget -O "Product Detection Q&A Chatflow.json" \
"http://145.239.66.197:3000/Hamza/Chatbot/raw/branch/main/Product%20Detection%20Q%26A%20Chatflow.json"
# OR using curl
curl -L -o "Product Detection Q&A Chatflow.json" \
"http://145.239.66.197:3000/Hamza/Chatbot/raw/branch/main/Product%20Detection%20Q%26A%20Chatflow.json"
```
> **Note:** The URL uses `/raw/branch/` to get the raw file content, not the Gitea preview page.
### Import into Flowise
1. Open Flowise at `http://localhost:3000`
2. On the **Chatflows** home page, click the **Add New** button (top right)
3. Instead of building from scratch, click the **Load** button (upload icon, top right of the canvas)
4. Select your `Product Detection Q&A Chatflow.json` file
5. The full flow will appear on the canvas automatically
Alternatively, from the **Chatflows** home page:
1. Click the **⋮ (three dots)** menu on any existing chatflow card
2. Select **Duplicate** — or use **Import** if available in your Flowise version
### After Importing
The flow is ready but you need to **reconfigure credentials** since API keys and local paths don't transfer between machines:
| Node | What to Reconfigure |
|---|---|
| **Ollama / ChatOllama** | Set Base URL to `http://localhost:11434` |
| **Ollama Embeddings** | Set Base URL to `http://localhost:11434` |
| **Faiss** | Set Base Path to `/root/.flowise/vectorstore` |
| **Document Store** | Re-upload or re-link your documents |
| **Any API node** | Re-enter API keys (OpenAI, Anthropic, etc.) |
### Create the Vector Store Directory
```bash
mkdir -p /root/.flowise/vectorstore
```
### Upsert After Import
After reconfiguring, always run Upsert before chatting:
1. Click the **Upsert** button (top right of canvas)
2. Wait for success confirmation
3. Verify the index was created:
```bash
ls /root/.flowise/vectorstore/
# Expected: faiss.index faiss.json
```
### Export Your Flow (for sharing or backup)
To export your current flow as a `.json` file:
1. Open the chatflow in Flowise
2. Click the **⋮ (three dots)** menu → **Export**
3. Save the `.json` file — commit it to your repository for teammates to import
---
## Build the Chatbot Flow
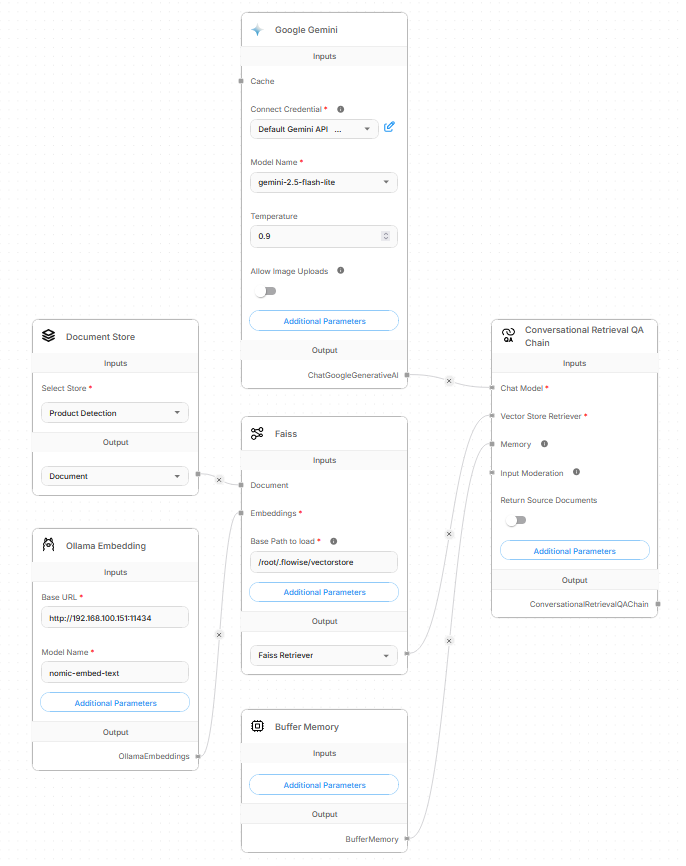
Open Flowise at `http://localhost:3000` → click **Add New** to create a new chatflow.
The final flow looks like this:
 ---
### Step 1: Recursive Character Text Splitter
Search for **"Recursive Character Text Splitter"** in the nodes panel and drag it onto the canvas.
| Setting | Recommended Value |
|---|---|
| Chunk Size | `1000` |
| Chunk Overlap | `200` |
---
### Step 2: Document Store (RAG)
Search for **"Document Store"** and drag it onto the canvas.
1. Click **Select Store** → **Create New Store**
2. Name it (e.g., `Product Documentation`)
3. Assign the **Recursive Character Text Splitter** to the Document Store
4. Add your documents:
- Click the store → **Add Document Loader**
- Choose a loader: **Text File**, **PDF File**, **Docx File**, etc.
- Upload your knowledge base files
5. Connect the **Document** output of the Document Store to the Faiss node
> **What to put in your documents:**
> Write plain text files or PDFs describing your software — features, FAQs, installation steps, error explanations, etc. The more detailed your docs, the better the chatbot answers.
---
### Step 3: Ollama Embeddings
Search for **"Ollama Embeddings"** and drag it onto the canvas.
| Setting | Value |
|---|---|
| Base URL | `http://localhost:11434` (or your server IP) |
| Model Name | `nomic-embed-text:latest` |
Connect the **OllamaEmbeddings** output to the **Embeddings** input of the Faiss node.
---
### Step 4: Faiss Vector Store
Search for **"Faiss"** and drag it onto the canvas.
| Setting | Value |
|---|---|
| Base Path to load | `/root/.flowise/vectorstore` (must be an existing directory) |
Create the directory if it doesn't exist:
```bash
mkdir -p /root/.flowise/vectorstore
```
Connect:
- **Document** output from Document Store → **Document** input of Faiss
- **OllamaEmbeddings** → **Embeddings** input of Faiss
The **Faiss Retriever** output connects to the **Vector Store Retriever** input of the QA Chain.
---
### Step 5: Ollama Chat Model
Search for **"ChatOllama"** or **"Ollama"** and drag it onto the canvas.
| Setting | Value |
|---|---|
| Base URL | `http://localhost:11434` (or your server IP) |
| Model Name | `qwen2.5:3b` |
| Temperature | `0.7` (lower = more factual, higher = more creative) |
> **Important:** Use the exact model name with a colon, e.g. `qwen2.5:3b` not `qwen2.5-3b`.
Connect the **ChatOllama** output to the **Chat Model** input of the QA Chain.
---
### Step 6: Buffer Memory
Search for **"Buffer Memory"** and drag it onto the canvas.
| Setting | Value |
|---|---|
| Session ID | *(leave empty — auto-uses the session ID passed by the user)* |
| Memory Key | `chat_history` |
Connect the **BufferMemory** output to the **Memory** input of the QA Chain.
> Buffer Memory keeps conversation history so users can ask follow-up questions naturally.
> Note: Buffer Memory resets if Flowise restarts. For persistent memory across restarts, use **Redis-Backed Memory** or **MongoDB Memory** instead.
---
## Upsert Documents
Before the chatbot can answer questions, you must index your documents into the vector store.
1. Click the **Upsert** button (top right of the canvas)
2. Wait for it to complete — you should see a success message
3. Verify the index files were created:
```bash
ls /root/.flowise/vectorstore/
# Expected output: faiss.index faiss.json
```
> **Re-upsert every time** you update or add documents to the Document Store.
---
## Using Cloud LLM APIs (Optional)
If you prefer using cloud providers instead of (or in addition to) Ollama:
### OpenAI
1. Get your API key at https://platform.openai.com/api-keys
2. In Flowise: **Settings** → **API Keys** → Add key
3. Replace the **ChatOllama** node with a **ChatOpenAI** node
4. Enter your API key and choose a model (e.g., `gpt-4o`)
### Anthropic (Claude)
1. Get your API key at https://console.anthropic.com
2. Replace the **ChatOllama** node with a **ChatAnthropic** node
3. Enter your API key and choose a model (e.g., `claude-sonnet-4-5`)
### Google Gemini
1. Get your API key at https://aistudio.google.com
2. Use the **ChatGoogleGenerativeAI** node
3. Enter your API key and model name (e.g., `gemini-1.5-pro`)
> **For Embeddings with cloud APIs:** Replace Ollama Embeddings with **OpenAI Embeddings** or **Google Generative AI Embeddings** nodes, using the same API key setup.
---
## Deploy Chatbot to Users
### Direct Link
Share the chatbot link directly — no account needed for users:
```
http://your-server-ip:3000/chatbot/YOUR-FLOW-ID
```
Find your flow ID in the URL when editing the flow.
Users just open the link and start chatting immediately. No signup required.
---
### Embed in Website
Paste this into any HTML page to show a chat bubble:
```html
```
Get your embed code from Flowise: open the flow → click the **`<>` (Embed)** button (top right).
---
### Session Management
Each user needs an isolated session to prevent seeing each other's conversation history.
| Scenario | Behavior |
|---|---|
| No `sessionId` set | All users share memory — **dangerous** |
| Unique `sessionId` per user | Fully isolated conversations |
| Using your own auth system | Pass your user's ID as the `sessionId` |
```javascript
// If users are logged into your system, use their user ID
sessionId: currentUser.id // e.g. "user_12345"
// For anonymous users, use localStorage (persists across page refreshes)
sessionId: localStorage.getItem("chatSessionId") || (() => {
const id = crypto.randomUUID();
localStorage.setItem("chatSessionId", id);
return id;
})()
```
---
### Rate Limiting
Limit how many messages a user can send to protect your server.
1. Open your flow in Flowise
2. Click **⚙️ Configuration** (top right)
3. Go to the **Rate Limiting** tab
4. Configure:
| Setting | Example Value |
|---|---|
| Message Limit | `20` |
| Duration (seconds) | `60` |
| Limit Message | `"Too many messages. Please wait a moment."` |
This limits each IP address to 20 messages per 60 seconds.
---
## Using Firecrawl (Scrape Websites into RAG)
Firecrawl lets you scrape entire websites and feed the content directly into your Document Store as a knowledge base. This is useful if your software documentation lives on a website or wiki.
---
### What Firecrawl Does
```
Your website / docs URL
↓
Firecrawl crawls all pages
↓
Returns clean Markdown text
↓
Loaded into Document Store
↓
Indexed into Faiss for RAG
```
---
### Option A: Firecrawl Cloud (Easiest)
1. Sign up at [https://firecrawl.dev](https://firecrawl.dev)
2. Get your API key from the dashboard
3. Add the API key to Flowise:
- Go to **Settings** → **API Keys** → **Add Credential**
- Choose **Firecrawl API** and paste your key
---
### Option B: Self-Host Firecrawl (No API Cost)
If you want to keep everything local and free:
#### Requirements
```bash
# Install Docker and Docker Compose
sudo apt-get install -y docker.io docker-compose
```
#### Setup
```bash
# Clone Firecrawl repository
git clone https://github.com/mendableai/firecrawl.git
cd firecrawl
# Copy environment file
cp .env.example .env
```
Edit the `.env` file:
```bash
nano .env
```
Set these values at minimum:
```env
NUM_WORKERS_PER_QUEUE=8
PORT=3002
HOST=0.0.0.0
REDIS_URL=redis://redis:6379
PLAYWRIGHT_MICROSERVICE_URL=http://playwright-service:3000/scrape
```
Start Firecrawl:
```bash
docker-compose up -d
```
Verify it's running:
```bash
curl http://localhost:3002/v1/scrape \
-H "Content-Type: application/json" \
-d '{"url": "https://example.com"}'
```
Your self-hosted Firecrawl API is now at `http://localhost:3002`
---
## Troubleshooting
### ❌ `fetch failed` when chatting
**Cause:** Flowise cannot reach Ollama.
**Fix:**
```bash
# Verify Ollama is reachable
curl http://localhost:11434/api/tags
# Check Ollama is running
systemctl status ollama
# Check model name is correct (must use colon, not dash)
# ✅ qwen2.5:3b
# ❌ qwen2.5-3b
ollama list
```
---
### ❌ `Cannot read properties of undefined (reading 'startsWith')`
**Cause:** The **Base Path to load** field in the Faiss node is empty.
**Fix:**
1. Click the Faiss node
2. Fill in Base Path to load: `/root/.flowise/vectorstore`
3. Create the directory: `mkdir -p /root/.flowise/vectorstore`
4. Re-upsert
---
### ❌ `could not open faiss.index for reading`
**Cause:** Upsert was never completed successfully — the index file doesn't exist.
**Fix:**
```bash
# Check if the file exists
ls /root/.flowise/vectorstore/
# If empty, fix the Base Path issue above, then Upsert again
```
---
### ❌ Ollama model not found
**Cause:** Model name is wrong or model was never pulled.
**Fix:**
```bash
# List available models
ollama list
# Pull the missing model
ollama pull qwen2.5:3b
ollama pull nomic-embed-text:latest
# Always use colon format in Flowise: qwen2.5:3b not qwen2.5-3b
```
---
### ❌ Flowise crashes or won't start
**Fix:**
```bash
# Check Node.js version (must be 18+)
node -v
# Clear Flowise cache
rm -rf ~/.flowise/cache
# Check port 3000 is not already in use
sudo lsof -i :3000
# Restart with PM2
pm2 restart flowise
pm2 logs flowise
```
---
### ❌ Out of memory / model too slow
**Fix:**
```bash
# Check available RAM
free -h
# Use a smaller model
ollama pull phi3:mini # 3.8B — lighter than qwen2.5:3b
# Check what's loaded in Ollama
ollama ps
```
If RAM is under 8GB, use `phi3:mini` or `qwen2.5:3b` (both under 4GB).
---
### ❌ Bot answers incorrectly or doesn't use documents
**Cause:** Documents are not properly indexed, or chunks are too small/large.
**Fix:**
1. Make sure you clicked **Upsert** after adding documents
2. Verify `faiss.index` and `faiss.json` exist in the Base Path
3. Try increasing **Chunk Size** to `1500` and re-upsert
4. Make sure your documents are in plain text, not scanned images
---
### ❌ Users share each other's conversation history
**Cause:** No `sessionId` is being passed, or all users get the same ID.
**Fix:** Use the embed code with a unique `sessionId` per user (see [Session Management](#session-management)).
---
## Quick Reference
| Component | Purpose |
|---|---|
| **Ollama** | Runs LLMs locally |
| **nomic-embed-text** | Converts text to vectors for search |
| **Faiss** | Stores and searches vectors |
| **Document Store** | Manages your knowledge base files |
| **Recursive Text Splitter** | Breaks documents into searchable chunks |
| **Buffer Memory** | Remembers conversation history per user |
| **Conversational Retrieval QA Chain** | Ties everything together |
| Port | Service |
|---|---|
| `3000` | Flowise UI and API |
| `11434` | Ollama API |
---
*Built with Flowise + Ollama. All models run locally — no data leaves your server.*
---
### Step 1: Recursive Character Text Splitter
Search for **"Recursive Character Text Splitter"** in the nodes panel and drag it onto the canvas.
| Setting | Recommended Value |
|---|---|
| Chunk Size | `1000` |
| Chunk Overlap | `200` |
---
### Step 2: Document Store (RAG)
Search for **"Document Store"** and drag it onto the canvas.
1. Click **Select Store** → **Create New Store**
2. Name it (e.g., `Product Documentation`)
3. Assign the **Recursive Character Text Splitter** to the Document Store
4. Add your documents:
- Click the store → **Add Document Loader**
- Choose a loader: **Text File**, **PDF File**, **Docx File**, etc.
- Upload your knowledge base files
5. Connect the **Document** output of the Document Store to the Faiss node
> **What to put in your documents:**
> Write plain text files or PDFs describing your software — features, FAQs, installation steps, error explanations, etc. The more detailed your docs, the better the chatbot answers.
---
### Step 3: Ollama Embeddings
Search for **"Ollama Embeddings"** and drag it onto the canvas.
| Setting | Value |
|---|---|
| Base URL | `http://localhost:11434` (or your server IP) |
| Model Name | `nomic-embed-text:latest` |
Connect the **OllamaEmbeddings** output to the **Embeddings** input of the Faiss node.
---
### Step 4: Faiss Vector Store
Search for **"Faiss"** and drag it onto the canvas.
| Setting | Value |
|---|---|
| Base Path to load | `/root/.flowise/vectorstore` (must be an existing directory) |
Create the directory if it doesn't exist:
```bash
mkdir -p /root/.flowise/vectorstore
```
Connect:
- **Document** output from Document Store → **Document** input of Faiss
- **OllamaEmbeddings** → **Embeddings** input of Faiss
The **Faiss Retriever** output connects to the **Vector Store Retriever** input of the QA Chain.
---
### Step 5: Ollama Chat Model
Search for **"ChatOllama"** or **"Ollama"** and drag it onto the canvas.
| Setting | Value |
|---|---|
| Base URL | `http://localhost:11434` (or your server IP) |
| Model Name | `qwen2.5:3b` |
| Temperature | `0.7` (lower = more factual, higher = more creative) |
> **Important:** Use the exact model name with a colon, e.g. `qwen2.5:3b` not `qwen2.5-3b`.
Connect the **ChatOllama** output to the **Chat Model** input of the QA Chain.
---
### Step 6: Buffer Memory
Search for **"Buffer Memory"** and drag it onto the canvas.
| Setting | Value |
|---|---|
| Session ID | *(leave empty — auto-uses the session ID passed by the user)* |
| Memory Key | `chat_history` |
Connect the **BufferMemory** output to the **Memory** input of the QA Chain.
> Buffer Memory keeps conversation history so users can ask follow-up questions naturally.
> Note: Buffer Memory resets if Flowise restarts. For persistent memory across restarts, use **Redis-Backed Memory** or **MongoDB Memory** instead.
---
## Upsert Documents
Before the chatbot can answer questions, you must index your documents into the vector store.
1. Click the **Upsert** button (top right of the canvas)
2. Wait for it to complete — you should see a success message
3. Verify the index files were created:
```bash
ls /root/.flowise/vectorstore/
# Expected output: faiss.index faiss.json
```
> **Re-upsert every time** you update or add documents to the Document Store.
---
## Using Cloud LLM APIs (Optional)
If you prefer using cloud providers instead of (or in addition to) Ollama:
### OpenAI
1. Get your API key at https://platform.openai.com/api-keys
2. In Flowise: **Settings** → **API Keys** → Add key
3. Replace the **ChatOllama** node with a **ChatOpenAI** node
4. Enter your API key and choose a model (e.g., `gpt-4o`)
### Anthropic (Claude)
1. Get your API key at https://console.anthropic.com
2. Replace the **ChatOllama** node with a **ChatAnthropic** node
3. Enter your API key and choose a model (e.g., `claude-sonnet-4-5`)
### Google Gemini
1. Get your API key at https://aistudio.google.com
2. Use the **ChatGoogleGenerativeAI** node
3. Enter your API key and model name (e.g., `gemini-1.5-pro`)
> **For Embeddings with cloud APIs:** Replace Ollama Embeddings with **OpenAI Embeddings** or **Google Generative AI Embeddings** nodes, using the same API key setup.
---
## Deploy Chatbot to Users
### Direct Link
Share the chatbot link directly — no account needed for users:
```
http://your-server-ip:3000/chatbot/YOUR-FLOW-ID
```
Find your flow ID in the URL when editing the flow.
Users just open the link and start chatting immediately. No signup required.
---
### Embed in Website
Paste this into any HTML page to show a chat bubble:
```html
```
Get your embed code from Flowise: open the flow → click the **`<>` (Embed)** button (top right).
---
### Session Management
Each user needs an isolated session to prevent seeing each other's conversation history.
| Scenario | Behavior |
|---|---|
| No `sessionId` set | All users share memory — **dangerous** |
| Unique `sessionId` per user | Fully isolated conversations |
| Using your own auth system | Pass your user's ID as the `sessionId` |
```javascript
// If users are logged into your system, use their user ID
sessionId: currentUser.id // e.g. "user_12345"
// For anonymous users, use localStorage (persists across page refreshes)
sessionId: localStorage.getItem("chatSessionId") || (() => {
const id = crypto.randomUUID();
localStorage.setItem("chatSessionId", id);
return id;
})()
```
---
### Rate Limiting
Limit how many messages a user can send to protect your server.
1. Open your flow in Flowise
2. Click **⚙️ Configuration** (top right)
3. Go to the **Rate Limiting** tab
4. Configure:
| Setting | Example Value |
|---|---|
| Message Limit | `20` |
| Duration (seconds) | `60` |
| Limit Message | `"Too many messages. Please wait a moment."` |
This limits each IP address to 20 messages per 60 seconds.
---
## Using Firecrawl (Scrape Websites into RAG)
Firecrawl lets you scrape entire websites and feed the content directly into your Document Store as a knowledge base. This is useful if your software documentation lives on a website or wiki.
---
### What Firecrawl Does
```
Your website / docs URL
↓
Firecrawl crawls all pages
↓
Returns clean Markdown text
↓
Loaded into Document Store
↓
Indexed into Faiss for RAG
```
---
### Option A: Firecrawl Cloud (Easiest)
1. Sign up at [https://firecrawl.dev](https://firecrawl.dev)
2. Get your API key from the dashboard
3. Add the API key to Flowise:
- Go to **Settings** → **API Keys** → **Add Credential**
- Choose **Firecrawl API** and paste your key
---
### Option B: Self-Host Firecrawl (No API Cost)
If you want to keep everything local and free:
#### Requirements
```bash
# Install Docker and Docker Compose
sudo apt-get install -y docker.io docker-compose
```
#### Setup
```bash
# Clone Firecrawl repository
git clone https://github.com/mendableai/firecrawl.git
cd firecrawl
# Copy environment file
cp .env.example .env
```
Edit the `.env` file:
```bash
nano .env
```
Set these values at minimum:
```env
NUM_WORKERS_PER_QUEUE=8
PORT=3002
HOST=0.0.0.0
REDIS_URL=redis://redis:6379
PLAYWRIGHT_MICROSERVICE_URL=http://playwright-service:3000/scrape
```
Start Firecrawl:
```bash
docker-compose up -d
```
Verify it's running:
```bash
curl http://localhost:3002/v1/scrape \
-H "Content-Type: application/json" \
-d '{"url": "https://example.com"}'
```
Your self-hosted Firecrawl API is now at `http://localhost:3002`
---
## Troubleshooting
### ❌ `fetch failed` when chatting
**Cause:** Flowise cannot reach Ollama.
**Fix:**
```bash
# Verify Ollama is reachable
curl http://localhost:11434/api/tags
# Check Ollama is running
systemctl status ollama
# Check model name is correct (must use colon, not dash)
# ✅ qwen2.5:3b
# ❌ qwen2.5-3b
ollama list
```
---
### ❌ `Cannot read properties of undefined (reading 'startsWith')`
**Cause:** The **Base Path to load** field in the Faiss node is empty.
**Fix:**
1. Click the Faiss node
2. Fill in Base Path to load: `/root/.flowise/vectorstore`
3. Create the directory: `mkdir -p /root/.flowise/vectorstore`
4. Re-upsert
---
### ❌ `could not open faiss.index for reading`
**Cause:** Upsert was never completed successfully — the index file doesn't exist.
**Fix:**
```bash
# Check if the file exists
ls /root/.flowise/vectorstore/
# If empty, fix the Base Path issue above, then Upsert again
```
---
### ❌ Ollama model not found
**Cause:** Model name is wrong or model was never pulled.
**Fix:**
```bash
# List available models
ollama list
# Pull the missing model
ollama pull qwen2.5:3b
ollama pull nomic-embed-text:latest
# Always use colon format in Flowise: qwen2.5:3b not qwen2.5-3b
```
---
### ❌ Flowise crashes or won't start
**Fix:**
```bash
# Check Node.js version (must be 18+)
node -v
# Clear Flowise cache
rm -rf ~/.flowise/cache
# Check port 3000 is not already in use
sudo lsof -i :3000
# Restart with PM2
pm2 restart flowise
pm2 logs flowise
```
---
### ❌ Out of memory / model too slow
**Fix:**
```bash
# Check available RAM
free -h
# Use a smaller model
ollama pull phi3:mini # 3.8B — lighter than qwen2.5:3b
# Check what's loaded in Ollama
ollama ps
```
If RAM is under 8GB, use `phi3:mini` or `qwen2.5:3b` (both under 4GB).
---
### ❌ Bot answers incorrectly or doesn't use documents
**Cause:** Documents are not properly indexed, or chunks are too small/large.
**Fix:**
1. Make sure you clicked **Upsert** after adding documents
2. Verify `faiss.index` and `faiss.json` exist in the Base Path
3. Try increasing **Chunk Size** to `1500` and re-upsert
4. Make sure your documents are in plain text, not scanned images
---
### ❌ Users share each other's conversation history
**Cause:** No `sessionId` is being passed, or all users get the same ID.
**Fix:** Use the embed code with a unique `sessionId` per user (see [Session Management](#session-management)).
---
## Quick Reference
| Component | Purpose |
|---|---|
| **Ollama** | Runs LLMs locally |
| **nomic-embed-text** | Converts text to vectors for search |
| **Faiss** | Stores and searches vectors |
| **Document Store** | Manages your knowledge base files |
| **Recursive Text Splitter** | Breaks documents into searchable chunks |
| **Buffer Memory** | Remembers conversation history per user |
| **Conversational Retrieval QA Chain** | Ties everything together |
| Port | Service |
|---|---|
| `3000` | Flowise UI and API |
| `11434` | Ollama API |
---
*Built with Flowise + Ollama. All models run locally — no data leaves your server.*